Almost nobody compresses an image for fun. You're here because something has a hard limit: a visa portal that rejects anything over 240KB, a job board that caps résumé photos at 200KB, an exam registration that wants a signature under 20KB. This guide covers how to hit those targets — 200KB, 100KB, 50KB, 20KB — without turning your photo into mush.
The fastest way: compress in your browser
The simplest path is a browser-side compressor that never uploads your file. Open the image compressor, drop your JPG or PNG, and download the smaller version. For a typical phone photo, a single pass lands well under 200KB already — often under 100KB — because the tool re-encodes with MozJPEG, the same encoder services like TinyPNG benchmark against.
Because it runs entirely on your device, nothing is uploaded to a server. That matters when the image is an ID scan, a signature, or a document photo.
What actually controls file size
Three things decide how many kilobytes an image takes:
- Format. A JPG of a photo is dramatically smaller than the same photo as a PNG. PNG is for graphics and screenshots; JPG is for photographs. If you need a tiny photo, start from JPG.
- Dimensions. A 4000×3000 photo has 12 million pixels to store. A 1000×750 version has under a million. Resizing is the single biggest lever for reaching very small targets like 20KB.
- Quality (compression level). JPG lets you trade visible quality for size. Going from quality 90 to 70 can halve the file with little visible difference.
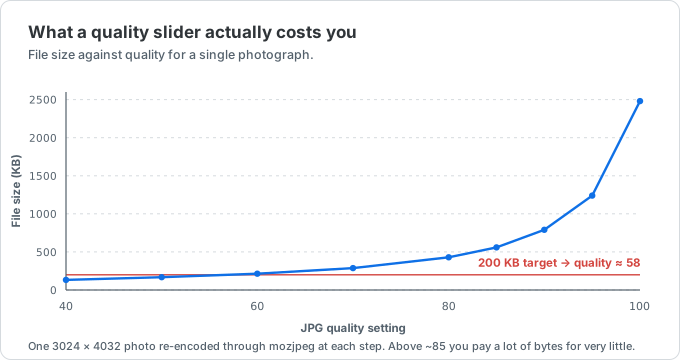
Read the curve from the right and the mistake becomes obvious. Most people reach for 100 because it sounds safe, and it is the one setting that is guaranteed to blow your budget. The useful range for hitting a size cap is 55–75, where the line is still almost flat — you give up very little and get most of the saving.
Targets and how to reach them
| Target | Typical use | How to get there |
|---|---|---|
| 200KB | Visa / passport uploads, most forms | One compression pass on a JPG is usually enough. |
| 100KB | Profile photos, forum avatars | Compress, and resize to ~1000px on the long edge if needed. |
| 50KB | Small ID photos, thumbnails | Resize to 600–800px, then compress as JPG. |
| 20KB | Signatures, exam-portal photos | Resize small (400–600px) and accept lower JPG quality. |
Compressing to 200KB
This is the most common request, largely because the US DS-160 visa form caps photos at 240KB and many government portals settle around 200KB. For an ordinary photo you rarely have to do anything clever: drop it into the compressorand the output is almost always under the line. If it isn't, the file is either a PNG (convert to JPG) or very high resolution (resize it down).
Compressing to 50KB or 20KB
Very small targets are where dimensions matter most. You cannot squeeze a 12-megapixel photo into 20KB while keeping it full-size — there simply isn't enough room to store that many pixels. Resize first: for a 20KB target, drop to roughly 400–600px on the long edge, then compress as JPG. For 50KB, 600–800px is a good starting point.
Run the compressor, check the result, and if it's still over, resize a little smaller and try again. Two passes get almost everything under the limit.
JPG vs PNG when size matters
If your source is a PNG photo, converting it to JPG is often a 5–10× size reduction on its own. Keep PNG only when you need transparency or pixel-perfect text and lines (logos, screenshots, diagrams). For photographs headed to a size-limited upload, JPG wins every time.
Making an ID or passport photo?
If you're compressing because a government form wants a photo under 240KB, crop it to the right dimensions first. Our ID photo size tool makes a US 2×2 (600×600px), a 35×45mm photo, and other standard sizes — then compress the result here to slip under the file-size limit. See passport photo sizes by country for the exact dimensions.
The short version
- Use JPG for photos, not PNG.
- Drop the file into the browser image compressor— for 200KB that's usually all you need.
- For 50KB or 20KB, resize the image smaller first, then compress.
- Re-run once if you're still over the limit.