Higher quality keeps more detail and usually creates a larger file.
Convert HEIC to JPG. Right in your browser.
Your iPhone photos never leave your device. Free, no signup, no watermark. Batch up to 50 files at once.
How it works
Three steps. Zero servers. Done in 30 seconds.
- 01
Drop your HEIC files
Drag and drop, or click to browse. Up to 50 files at once.
- 02
Convert in your browser
WebAssembly decodes HEIC locally. Zero upload, zero server.
- 03
Download JPG instantly
Single file? Direct download. Multiple? Get a zip.
Why browser-side matters
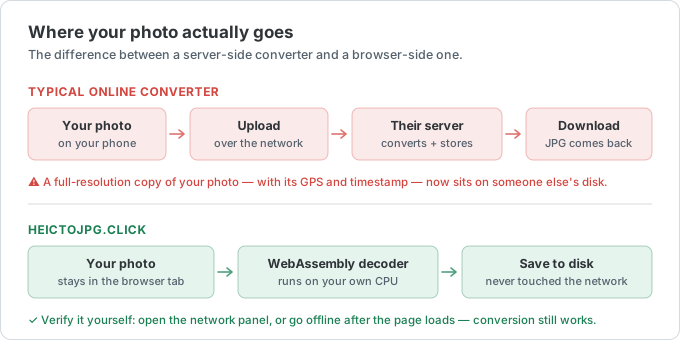
Most online HEIC converters upload your photos to their servers. We don't. Here's why that changes everything.
Other converters
- Upload your photos to their servers
- Wait for the server round-trip
- Hope they actually delete after
- File size limits to protect their bandwidth
- Ads everywhere, signup walls
heictojpg.click
- Everything runs locally in your browser
- Instant - no server round-trip
- Files literally cannot leave your device
- Works offline after first load
- Free, no signup, forever
What to know before you convert
Which format to target, what survives the conversion, and how to stop your iPhone producing HEIC in the first place.
When JPG isn't the best choice
JPG is the safe default: every phone, browser, printer, and upload form accepts it. But it's lossy and has no transparency. If your image has a transparent background — a logo, a sticker, an icon — JPG flattens it onto a solid color, so convert to PNG instead. For screenshots and sharp text, PNG also keeps edges crisp where JPG can smear them.
One thing to know: HEIC is already a compressed format, so converting to JPG re-encodes the photo once. At our default quality the difference is invisible for normal photos, but if you plan to edit and re-save repeatedly, keep an original copy.
How this compares to the other converters
Want the smallest file for a website? HEIC to WebP is typically 25–35% smaller than JPG at the same quality. Need transparency or lossless quality? HEIC to PNG. Sending photos as one document to print or email? HEIC to PDF bundles them into a single file. Just want to look at a .heic without converting? The HEIC viewer opens it in place.
All of them run entirely in your browser — same privacy, same batch support, no uploads.
What the converted JPG keeps, and what it drops
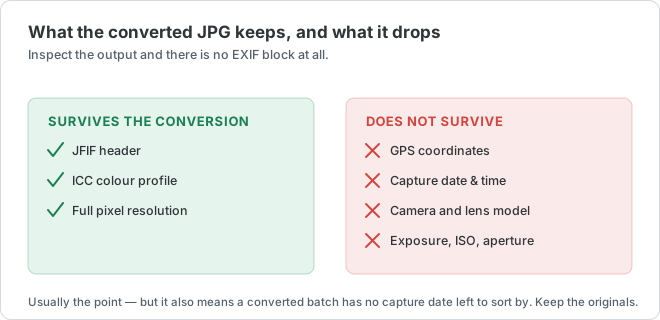
The conversion decodes the HEIC to pixels and re-encodes those pixels as JPG. Inspect the output and you find exactly two metadata segments: a JFIF header and the ICC colour profile. There is no Exif block — no GPS coordinates, no capture timestamp, no camera model, no lens or exposure data. Colours stay correct because the profile survives; everything the phone recorded about where and when you were does not.
That is usually the outcome people want when they are about to attach a photo to a forum post, a marketplace listing, or a form. It is worth knowing in advance, though, because it cuts both ways: the JPG has no capture date, so some galleries will sort a converted batch by download time rather than by when the photos were taken. If the dates matter, keep the HEIC originals — which you still have, since nothing here modifies your input files.
Picking a quality number
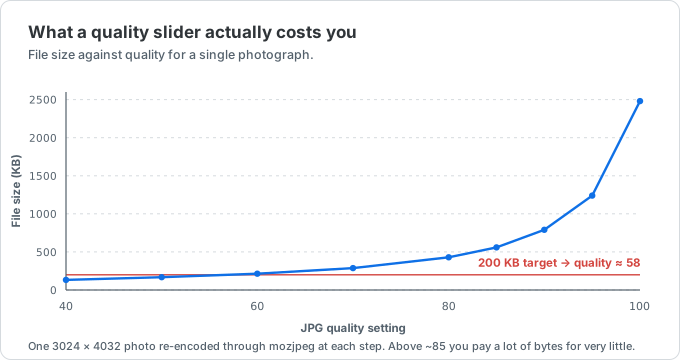
The slider defaults to 92, which is high enough that the re-encode is invisible on an ordinary photograph and low enough that the file does not balloon. It has to be read before the batch starts, so set it first — changing it later applies to the next files you add, not the ones already converted.
Worth being aware of: HEIC is itself a lossy format, so converting to JPG is a second generation encode. One generation at 92 is not something you can see. Repeatedly editing and re-saving a JPG is, and that is the case for keeping the originals rather than treating the converted copies as your archive. If you are converting for an upload form with a hard size cap, dropping to the low 80s usually saves far more bytes than it costs in visible quality.
If a specific KB limit is the actual problem — 240 KB for a US visa photo, 2 MB for many job applications — converting at a guessed quality is the slow way round. The image compressor targets a size directly, and there is a walkthrough for the common case in how to compress an image to 200KB.
Or stop the iPhone from producing HEIC at all
If you convert the same photos every week, the better fix is upstream. On the phone, Settings › Camera › Formats › Most Compatible makes the camera capture JPG from then on, at roughly double the storage per photo. It does not touch the HEIC files already in your library.
Separately, Settings › Photos › Transfer to Mac or PC › Automatic converts on the way out when you plug into a computer, while Keep Originals sends the HEIC untouched. A lot of people who think their phone is broken have this set to Keep Originals and a Windows machine on the other end.
Both settings, with the trade-offs and the reason Apple switched in the first place, are covered in why your iPhone saves photos as HEIC and HEIC vs JPG.

Frequently asked
Still stuck? Email us.
What is HEIC and why does my iPhone use it?
HEIC (High Efficiency Image Container) is Apple's default photo format since iOS 11. It uses about half the storage of JPG at the same quality. The downside: Windows, Android, and most websites can't open it without conversion.
Is my photo uploaded anywhere?
No. Conversion runs 100% in your browser using WebAssembly. Your files never touch a server. You can disconnect from the internet after the page loads and conversion still works.
What's the maximum file size?
Up to 50 MB per file, and up to 50 files at once. Very large batches may slow down depending on your device, since everything runs locally.
Can I batch convert multiple files?
Yes. Drop multiple HEIC files at once and you'll get a single ZIP with all the converted JPGs.
Is the JPG quality lossy?
JPG is inherently lossy. The converter defaults to 92% quality, and you can adjust it from 60% to 100% before adding files. Higher settings retain more detail but usually create larger files, so keep the original HEIC for archival use.
Is this really free?
Yes — supported by unobtrusive ads. No signup, no email, no watermark. Forever free.