macOS opens HEIC files natively, so you don't need to install anything to convert them to JPG. There are five free ways built into the system — including one that converts a whole folder in a couple of clicks, and one that converts thousands from a single Terminal line. Here's each, when to use it, and what the conversion costs you.
1. Preview — best for one or two files

- Double-click the HEIC file to open it in Preview.
- Choose File → Export.
- Set Format to JPEG, adjust the quality slider, and click Save.
You can also select several files in Finder, open them together in Preview, select all in the sidebar, and use File → Export Selected Images to do a small batch. Hold Option while opening the Format menu if you want the full list of formats.
2. Finder Quick Action — best for batches
This is the hidden gem on modern macOS (Monterey and later):
- Select one or many HEIC files in Finder.
- Right-click and choose Quick Actions → Convert Image.
- Pick JPEG, choose an image size, and click Convert to JPEG.
It converts the whole selection at once and drops the JPGs right next to the originals. No app, no export dialog per file. If you don't see Convert Image in the menu, your Mac is on an older macOS — use Preview or the Terminal method below instead.
3. Photos app
If the images live in your Photos library, select them, then drag them to the desktop or use File → Export → Export Photos and choose JPEG. This is the only built-in method with an explicit Location Informationcheckbox, so it's the one to use when you're about to post photos publicly and want the GPS coordinates stripped.
4. Terminal (sips) — best for a folder of hundreds
sips ships with every Mac and needs no install. To convert one file:
sips -s format jpeg photo.heic --out photo.jpgTo convert every HEIC in the current folder, open Terminal, drag the folder in after
cd to move there, then run:
for f in *.heic; do sips -s format jpeg "$f" --out "${f%.heic}.jpg"; doneAdd -s formatOptions 80 to trade quality for a smaller file (the number is a 0–100 JPEG quality). This is by far the fastest route for a large archive, and unlike the Quick Action it works on every macOS version.
5. Browser converter — cross-platform, no fiddling
If you bounce between a Mac and a Windows or work machine, or you just want one method that works the same everywhere, open heictojpg.clickin any browser, drop your HEIC files, and download the JPGs (or grab them all as a ZIP). It runs entirely in the browser — nothing is uploaded — so it's as private as Preview but works on any computer.
The same tool also handles HEIC to PNG and HEIC to PDF if you need those instead.
Expect the JPG to be bigger, not smaller
This surprises people: converting HEIC to JPG usually increasesthe file size. HEIC uses HEVC compression, which is roughly twice as efficient as JPEG at the same visual quality, so the same photo re-encoded as a JPG often lands at 1.5–2× the original. You're trading storage for compatibility.
If the JPG has to fit a size limit — an application form capped at 200 KB, say — convert first and then compress it to an exact size, or read how to compress an image to 200 KB.
What doesn't survive the conversion
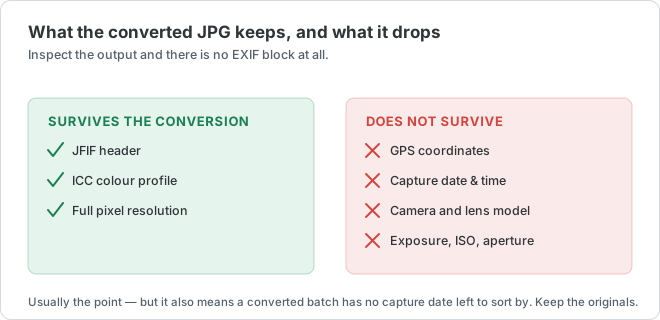
- Live Photos — a Live Photo is a HEIC still plus a separate .MOV clip. Converting gives you the still frame only; the motion stays behind.
- Depth and Portrait data — HEIC can carry a depth map that lets Photos re-edit the background blur later. JPEG has nowhere to put it, so that editability is gone.
- Transparency — rare in phone photos, but if your HEIC has an alpha channel, JPEG will flatten it. Export to PNG instead.
Ordinary EXIF (date, camera, exposure) generally comes across. If metadata matters either way — you need it kept, or you need it gone — check the output before sending, and use the Photos export dialog when you specifically want location stripped.
Troubleshooting
- The file still says HEIC after renaming it. Changing the extension from .heic to .jpg does nothing — the bytes inside are still HEVC. You have to re-encode with one of the methods above.
- Quick Actions has no “Convert Image”. That entry arrived in macOS Monterey. On older systems, use Preview or
sips. - An app still rejects the JPG. Check the size limit rather than the format — see the file size note above.
Which one should you use?
- One or two files: Preview.
- A whole folder: the Finder Quick Action.
- Hundreds, or an old macOS: the
sipsone-liner. - Photos already in your library: the Photos app export.
- Same method on any computer: the browser converter.
Only need to look at the photo rather than convert it? See how to open HEIC files on a Mac. Not sure whether you even need to convert? HEIC vs JPG covers when each format makes sense.